2023年12月25日 星期一

[AWS] Security Hub 教你如何設定

Written by: AWS Community Builder Wang Sheng Hau

大家可能會很好奇 Security Hub 是什麼,再來他可以為我們公司帶來什麼樣的幫助?

這邊稍微介紹一下什麼是 AWS Security Hub !

AWS Security Hub 為您提供中安全性狀態的全面檢視,並根據安全性產業標準和最佳做法來評估你的AWS雲端環境,會收集和支援的協力廠商產品之間 AWS 帳戶的安全性資料 AWS 服務,並協助您分析安全性趨勢並找出最優先順序的安全性問題。

為了協助您管理組織的安全性狀態,Security Hub 支援多種安全性標準。其中包括由開發的 AWS基礎安全性最佳實務 (FSBP) 標準AWS,以及外部合規架構,例如網際網路安全中心 (CIS)、支付卡產業資料安全標準 (PCI DSS),以及美國國家標準與技術研究所 (NIST)。每個標準都包含數個安全控制,每個控制都代表安全性最佳實務。Security Hub 會針對安全性控制執行檢查,並產生控制發現項目,協助您根據安全性最佳實務來評估合規性。

除了產生控制發現之外,Security Hub 還會收到來自其他 AWS 服務 (例如 Amazon GuardDuty、Amazon Inspector 和 Amazon Macie) 的發現結果,以及支援的第三方產品。這為您提供了一個單一窗格,解決各種與安全性相關的問題。


優點

可讓您更輕易地收集和排列問題清單的優先順序

Security Hub 可減少收集整合式和合AWS作夥伴產品跨帳戶的安全發現項目AWS 服務並排定優先順序的工作。Security Hub 使用AWS安全性尋找格式 (ASFF) (標準尋找格式) 來處理尋找資料。這樣就不需要以多種格式管理來自眾多來源的發現項目。Security Hub 也會關聯不同提供者的發現項目,協助您排定最重要的項目的優先順序。

根據最佳實務和標準自動進行安全檢查

Security Hub 會根據AWS最佳實務和業界標準,自動執行連續的帳戶層級組態和安全性檢查。Security Hub 使用這些檢查的結果來計算安全分數,並識別需要注意的特定帳戶和資源。

合併帳戶與提供者問題清單的檢視

Security Hub 會整合帳戶和提供者產品之間的安全發現項目,並在 Security Hub 主控台上顯示結果。您也可以透過安全中心 API 或 SDK 擷取發現項目。AWS CLI透過全面檢視您目前的安全狀態,您可以發現趨勢、識別潛在問題,並採取必要的補救措施。

能夠自動尋找更新和補救

您可以建立根據您定義的條件修改或隱藏發現項目的自動化規則。Security Hub 還支持與亞馬遜的集成 EventBridge。若要自動修復特定發現項目,您可以定義產生搜尋結果時要採取的自訂動作。例如,您可以設定自訂動作,將問題清單傳送到售票系統或自動化修補系統。


上面介紹了這麼多,接下來我們來實際的設定一遍,就知道成效了

1. 建立 AWS Security Hub


2. 選擇要套用的安全標準後即可開


3. 一開始尚未設定 Security Hub 時的 AWS Config 規則


4.設定後會發現規則數量變多(Security Hub 的規則前面會加上 securityhub,且無法調整)

這邊的規則為完整 security hub 規則


5. 至 Security Hub Summary 首頁可以看分數

6. Security standards 則可選擇檢核套餐結果

7. 進入後可點選 Title 看狀態

  1. 可以查看檢測項目該如何修復

  2. 目前儀錶板狀態(24 小時更新一次)

  3. 實際狀態

Findings 看找到的問題,並點選看,Findings 為全部狀態,不見得會與 Controls

Summary 相同,Controls Summary 所呈現容,只會呈現所選檢核套餐中的項目

也可以查看找到的問題以及漏洞的相關說明


2023年12月20日 星期三

[AWS] CloudWatch 監控 EC2 指標設定 Workshop

Written by: AWS Community Builder Wang Sheng Hau

這邊針對 Cloud Watch 不知道該怎麼設定監控指標做了一個簡易的 Demo 說明給客戶看

也因此把他更新上來紀錄一下,給有需要的朋友參考使用


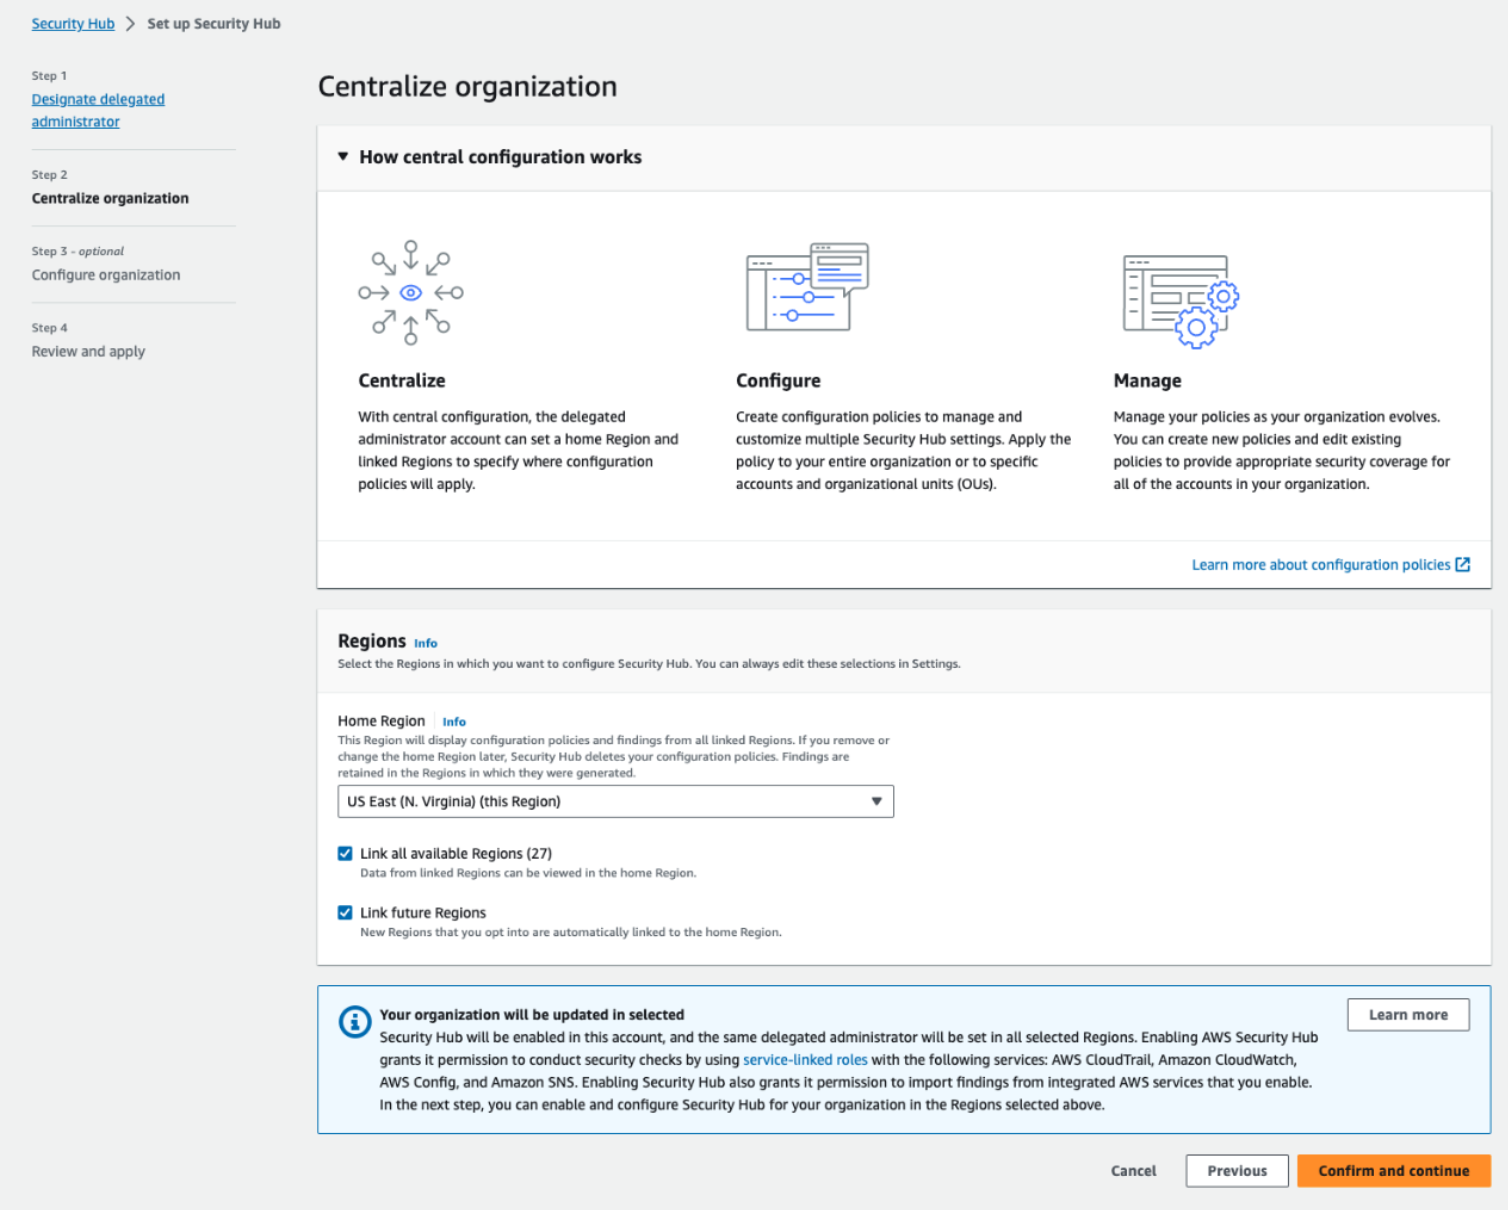
1. 登入 AWS CloudWatch 的Console 畫面

2. 點選左邊 , 所有指標

3. 點選 EC2 指標 , 點選想監控之 EC2

4. 可選用預設的指標 , 如 CPU Disk I/O Network I/O 等等

5. 點選 圖表化指標選項 可以設定 統計值 統計時間的頻率

6. 點選 Query 可以自定義值

7. 透過設定的儀表板可以看到EC2監控的指標


8. CloudWatch Metrics 說明

Instance Metrics

• CPUUtilization: This metric tracks the cpu utilization of the underlying EC2

instance as a percentage of its allocated EC2 compute units. In other words,

it tracks, as a percentage, the amount of allocated EC2 compute units that

are currently in use on the instance.

• DiskReadOps: This metric tracks the number of completed read operations

from all instance store volumes available to the instance in a specified period

of time.

• DiskWriteOps: This metric tracks the number of completed write operations

to all instance store volumes available to the underlying instance in a

specified period of time. If there are no instance store volumes attributed to

this instance, either the value is 0 or the metric is not reported.

• DiskReadBytes: This tracks the amount of data, in bytes, read from all

instance store volumes available to the instance over a period of 5 minutes

for the basic monitoring and 1 minute for detailed monitoring. This metric is

used to determine the volume of the data the application reads from the hard

disk of the instance and can be used to determine the speed of the

application. If there are no instance store volumes for this instance, either

the value is 0 or the metric is not reported.

• DiskWriteBytes: This metric records the amount, in bytes written, to all

instance store volumes available to the instance over a period of 5 minutes

for the basic monitoring and 1 minute for detailed monitoring. It tracks how

fast the application writes data to its underlying disk, and thus can be used

to infer the speed of the application. If there are no instance store volumes

for this instance, either the value is 0 or the metric is not reported.

• NetworkIn and NetworkOut: These metrics track the amount of bytes

transferred on all network interfaces by the instance, with the former

(NetworkIn) recording the amount of bytes received and the latter

(NetworkOut) recording the amount of bytes sent out. These trackings are

done with respect to the recording period, that is, these metrics record the

amount of bytes transferred in a 5 minute period for the basic monitoring,

and 1 minute period the detailed monitoring.

• NetworkPacketsIn and NetworkPacketsOut: These metrics track the number

of packets received (NetworkPacketsIn) and sent out (NetworkPacketsOut)

on all network interfaces by the instance. They identify the volume of

incoming and outgoing traffic in terms of the number of packets on a single

instance. These metrics are available for basic monitoring only.

• MetadataNoToken: This metric tracks the number of times the instance

metadata service was successfully accessed using a method that does not

use a token. It is used to determine if there are any processes using

Instance Metadata Service Version 1 to access instance metadata (Instance

Metadata Service Version 1 does not use a token). If all requests use tokenbacked

sessions, i.e., Instance Metadata Service Version 2, the value is 0.


CPU Credit Metrics

• CPUCreditUsage: This metric tracks the number of CPU credits consumed

by the instance for CPU utilization over a period of 5 minutes. One CPU

credit is equivalent to one vCPU running at 100% capacity for one minute or

an equivalent combination of vCPUs, time, and capacity (for example, one

vCPU running at 50% capacity for two minutes or two vCPUs running at

25% capacity for two minutes).

• CPUCreditBalance: This tracks the number of earned CPU credits that an

instance has accrued since it was launched or started. In other words, it

tracks the number of CPU credits available to an instance ( total credits

amassed over time minus the total credits the instance has used in previous

bursts).

• CPUSurplusCreditBalance: This tracks the number of surplus credits that

have been spent by an unlimited instance ( an unlimited instance is a

burstable instance that has been configured to run in unlimited mode, that is,

it can sustain performance bursts whenever and however long it requires)

when its CPUCreditBalance value is zero. Surpluses are paid back by

earned CPU credits, but if this surplus goes over the maximum cpu credit

this instance can earn in a 24 hour period, you may incur an additional

charge.

• CPUSurplusCreditsCharged: This tracks the number of spent surplus credits

that are not paid back by earned CPU credits, and which thus incur an

additional charge.


Amazon EC2 Usage Metrics

• Service: This refers to the name of the AWS service containing the resource

being tracked. In this case, the service name is EC2.

• Type: This specifies the type of entity that is being tracked, in this case, a

Resource.

• Resource: This specifies the type of resource being tracked, and the only

valid value for EC2 usage metrics is vCPU.

• Class: This specifies the class of the resource being tracked. For EC2

instances, the valid values

are Standard/OnDemand, F/OnDemand, G/OnDemand, Inf/OnDemand, P/O

nDemand, and X/OnDemand.


2023年12月4日 星期一

[AWS] AWS re:Invent 2023 - Security & Identity Session ReCap

Written by: AWS Community Builder Wang Sheng Hau

又到了一年一度 AWS re:Invent 2023 的年度盛會了,這次一樣也是針對 Security & Identity 相關的 Session 來摘要一下,詳細資料可以從文末的連結去查看更詳細的內容介紹


1.  AWS CloudTrail Lake 資料現在可用於 Amazon Athena 中的 Zero ETL 分析


CloudTrail Lake 現在可在 Athena 中進行 Zero ETL分析,無需搬移數據。

資安工程師可進行相關性分析,可使用 QuickSight 和 Managed Grafana 進行可視化報告。


想要使用此功能需在 CloudTrail Lake 中啟用數據聯邦化,並使用 Glue Data Catalo g和AWS Lake Formation 進行設定。


在所有 AWS 區域中都可以使用此服務,費用按 Athena 和CloudTrail Lake 定價收費。


https://aws.amazon.com/tw/about-aws/whats-new/2023/11/aws-cloudtrail-lake-zero-etl-anlysis-athena/


後面有兩篇都跟 AWS Detective 有關聯,為了讓同學們能了解什麼是 AWS Detective

這邊介紹一下什麼是 AWS Detective 是什麼?


Amazon Detective 可協助分析、調查並快速識別安全結果或可疑活動的根本原因。 

Detective 會自動從​ AWS 資源收集日誌資料。 使用機器學習、統計分析和圖論來產生視覺化效果,幫助更快、更有效率地進行安全調查。 

Detective 預先建置的資料聚合、摘要和上下文可更快速分析和確定可能的安全問題的性質和程度。


https://aws.amazon.com/tw/detective/


透過圖上可以了解到 AWS Detective 的運作原理及流程


2. Amazon Detective 支援從 Amazon Security Lake 檢索日誌


Amazon Detective 現在與 Amazon Security Lake 集成,使安全分析師能夠查詢並檢索存儲在 Security Lake 中的日誌。


您可以使用此集成在 Detective 進行安全調查時從 AWS CloudTrail 日誌和 Amazon Virtual Private Cloud (Amazon VPC) Flow Logs 中獲取 Security Lake 中存儲的額外訊息。

https://aws.amazon.com/tw/about-aws/whats-new/2023/11/amazon-detective-log-retrieval-security-lake/


3. GuardDuty ECS 運行時的偵探安全調查


Detective 現在支援 Amazon GuardDuty Elastic Container Service (ECS) Runtime Monitoring檢測到的威脅的安全調查。Amazon Detective 現在提供了增強的可視化和有關 ECS 上檢測的附加上下文。


可以使用來自 GuardDuty 的新運行時威脅檢測和 Detective 的調查功能,提高對容器工作負載潛在威脅的檢測和應對能力。

Detective支援對這些新檢測的調查,包括與其他發現的相關聯,圖形可視化和其他摘要,以加速安全調查。


https://aws.amazon.com/tw/about-aws/whats-new/2023/11/amazon-detective-security-guardduty-ecs-monitoring/


4. Amazon Detective 宣布對 IAM 進行自動調查


Amazon Detective 現在支援自動調查 AWS Identity and Access Management (IAM) 實體以尋找洩漏指標 (IoC) 的功能。 這項新功能可協助安全分析師確定 IAM 實體是否可能受到損害或涉及 MITRE ATT&CK 框架中的任何已知策略、技術和程序 (TTP)。


Detective 可以更輕鬆地分析、調查並快速識別潛在安全問題或可疑活動的根本原因。 啟用後,Detective 會自動從 AWS 資源收集日誌數據,並使用機器學習、統計分析和圖論來建立互動式視覺化,以更快、更有效率地進行安全調查,並且自動分析 IAM 使用者和 IAM 角色,以快速發現潛在的 IoC 和 TTP。


https://aws.amazon.com/tw/about-aws/whats-new/2023/11/amazon-detective-investigations-iam/


5.  Amazon GuardDuty 現在支援 Amazon EC2 的執行時間監控(Preview)


Amazon GuardDuty EC2 執行時間監控預覽版,這是 Amazon GuardDuty 的擴展,為 Amazon Elastic Compute Cloud (Amazon EC2) 工作負載引入執行階段威脅偵測。


GuardDuty EC2 執行時間監控加深了 Amazon EC2 工作負載的威脅偵測覆蓋範圍。 它使您可以了解主機上、作業系統層級的活動,並提供偵測到的威脅的容器層級上下文。


透過此擴充功能,GuardDuty 可以幫助您識別並回應可能針對 EC2 工作負載中的運算資源的潛在威脅。

https://aws.amazon.com/tw/about-aws/whats-new/2023/11/amazon-guardduty-runtime-monitoring-amazon-ec2-preview/


6. Amazon Inspector 透過生成式 AI 支援的修復功能擴展了 AWS Lambda 程式碼掃描


AWS Lambda 函數的 Amazon Inspector 程式碼掃描現在包括使用產生人工智慧 (AI) 和自動推理的輔助程式碼修復。 


針對 Lambda 函數的 Amazon Inspector 程式碼修復為 AWS Lambda 函數安全掃描期間偵測到的多類別漏洞提供上下文程式碼修補程式。 


它擴展了 Amazon Inspector 的功能,可根據 AWS 安全最佳實踐評估自訂專有 Lambda 程式碼是否有註入缺陷、資料外洩、弱加密或缺失加密等安全性問題。 


發現漏洞後,Amazon Inspector 會提供可操作的安全結果,包括受影響的程式碼片段和修復建議。 作為支援的調查結果的一部分,Amazon Inspector 提供了與漏洞相關的程式碼補丁,從而簡化了更新易受攻擊的程式碼的過程。

https://aws.amazon.com/tw/about-aws/whats-new/2023/11/amazon-inspector-aws-lambda-code-scanning/


7. AWS 的新功能:現在可以在 AWS Security Hub 中自定義安全控制


Security Hub 控制項中的客戶特定輸入,使您能夠自訂 AWS 中的安全態勢監控。 Security Hub 是一項雲端安全態勢管理 (CSPM) 服務,具有數百個託管和自動化控件,可讓您監控雲端資源並確保它們得到安全配置。 


Security Hub 在發佈時支援 30 多個控制項的自訂。

https://aws.amazon.com/tw/about-aws/whats-new/2023/11/customize-security-controls-aws-security-hub/


8. Amazon WorkSpaces Thin Client 現已全面上市


這是一種低成本最終用戶設備,可協助組織降低整體虛擬桌面成本、加強安全狀況並簡化最終用戶部署。


透過 WorkSpaces Thin Client 端服務,IT 管理員可以全面了解其庫存,並可以遠端重置、修補和控制對瘦客戶端的存取

https://aws.amazon.com/tw/about-aws/whats-new/2023/11/amazon-workspaces-thin-client/


9. AWS Security Hub 中新的中央配置功能


隨著 Security Hub 新的中央配置功能的發布,控制和策略配置的設定和管理得到了簡化,並集中到您已用於聚合結果的相同帳戶。


您現在可以使用委派管理員 (DA) 帳戶(指定用於管理整個組織內的 Security Hub 的 AWS Organizations 帳戶)來集中管理 Security Hub 控制和標準,並從一個位置查看整個組織中的Security Hub 配置。 


為了促進此功能,集中配置可讓您設定策略來指定是否應啟用 Security Hub 以及應開啟哪些標準和控制項。 然後,您可以選擇將您的策略與整個組織或特定帳戶或組織單位 (OU) 關聯,並在連結的區域中自動套用您的策略。


 應用於特定 OU(或整個組織)的策略由子帳戶繼承。 這不僅適用於現有帳戶,也適用於建立策略後新增至這些 OU(或整個組織)的新帳戶。


https://aws.amazon.com/blogs/security/introducing-new-central-configuration-capabilities-in-aws-security-hub/


2023年11月29日 星期三

[AWS] AWS re:Invent 2023 Amazon Q (preview)

Written by: AWS Community Builder Wang Sheng Hau

Exciting things are happening as we truly enter the flourishing era of Generative AI. Various companies are progressively integrating Gen AI into their products, allowing users to harness its capabilities.

I'm delighted to share that at this year's AWS re:Invent 2023, AWS introduced the Amazon Q service. This is a groundbreaking generative Artificial Intelligence (AI) assistant designed specifically for tasks tailored to your business needs. With Amazon Q, you can connect to your company's information repositories, code, data, and enterprise systems for dialogue, issue resolution, content generation, gaining insights, and taking action. Amazon Q provides employees with real-time, relevant information and suggestions to simplify tasks, expedite decision-making, problem-solving, and inspire creativity and innovation in the workplace.

Learn more about Amazon Q at:
https://lnkd.in/gGXM8q5T

當我們真正進入生成人工智慧的繁榮時代時,令人興奮的事情正在發生。 多家公司正在逐步將 Gen AI 整合到他們的產品中,讓用戶能夠利用其功能。

我很高興與大家分享,在今年的 AWS re:Invent 2023 上,AWS 推出了 Amazon Q 服務。 這是一款突破性的生成式人工智慧 (AI) 助手,專為根據您的業務需求量身定制的任務而設計。 透過 Amazon Q,您可以連接到公司的資訊儲存庫、程式碼、資料和企業系統,以進行對話、解決問題、產生內容、取得見解並採取行動。 Amazon Q 為員工提供即時、相關的資訊和建議,以簡化任務、加速決策、解決問題並激發工作場所的創造力和創新。


2023年10月23日 星期一

[AWS] AWS Application Migration Service

Written by: AWS Community Builder Wang Sheng Hau

因為最近陸續有幫客戶進行地端搬遷服務至 AWS 雲端上,加上前陣子 AWS Partner SA 有來公司介紹 AWS MGN 這個服務,因此把一些筆記紀錄上來。

AWS Application Migration Service (AWS MGN) 是一個高度自動化的解決方案,可簡化、加速並降低遷移和現代化應用程序的成本。它允許企業遷移大量的物理、虛擬和雲伺服器,而無需兼容性問題、性能中斷或長時間的切換窗口。AWS MGN持續複製來源伺服器到您的AWS帳戶。當您準備就緒時,它會自動將伺服器轉換並在AWS上啟動,以便您能夠迅速受益於雲端的成本節省、生產力、韌性和靈活性。此外,AWS MGN還允許您運行預配置的操作,以現代化運行的應用程序。 [1]

AWS MGN 可以自動化已流水線的方式,透過 Agent 去自動執行


蠻通用的場景(不止地搬雲,或是公有雲搬遷也適用,搬 Storage 只要能把 Agent 安裝上幾乎都可以使用)


優勢 : 搬遷步驟及方法對客戶來說比較友善也比較容易上手

AWS MGN 遵循 AWS Migration Customer Journey (7R) 的規範


針對客戶端的說明,可能會需要了解雲端網路架構(客戶對大數量搬遷沒信心取決於對雲端架構不熟的情況下就直接搬遷),因此這邊可以對客戶進行 Level 200 or 300 的介紹

針對超過超過 30個 以上的 VM 幾乎都會建議改用 AWS VMC [3] (VMware) 的方式搬遷

前提是客戶在地端就是使用 VMware

AWS MGN 可以實時的顯示地端操作的異動,都會抄寫上來,對於備份也是很有幫助的

但這邊需要跟客戶說明 AWS MGN 還是會是已一次性搬遷為主,假設要做到持續性抄寫或是 DR Site 備援的話,則建議使用另一個 AWS 服務

在大部分 POC 階段都是作 Site to Site VPN ,等上線後才會改成 AWS Direct Connect

針對網路架構 Network Architecture - Private subnet (跟客戶這樣解釋)

地端抄寫 > STG > POC 端 (不影響 Prod 環境)


可以即時把抄寫上去的機器,透過 template 開起來測試,確認沒問題後在關閉

對於搬遷速度取決於客戶端對外頻寬,主機容量大小等等因素都會影響

AWS MGN 需要使用 TCP 443 port、Data Transfer 是走 TCP 1500 port、DNS traffic UDP 53 port

AWS MGN 搬遷 database 最大容量 16 TB 上限

AWS DRS and MGN 差異在於 DRS 是可以 fail back , AWS MGN 上雲後就無法 fail over (有特殊手段,要安裝 Agent 才能反向,但好像僅支援 Linux)

只要 90 天轉移完成就是免費 (by server),收費僅收費傳輸費 還有機器開啟規格的費用

PS : DRS 預設可以還原 7天,如果花錢可以存到 365 day (存 AMI)

如果是 data 資料有時會還在記憶體暫存,沒有寫到 disk,這樣抄寫可能會遇到資料 downtime

Database 傳輸要用 MGN 或是 DMS 這要跟客戶討論

如果遇到是 Redhat 或是 Suse 有 License 版本的主機,這樣透過 MGN 搬遷後需要去 aws marketplace 在開一台 for license 的 EC2 在掛載 EBS 過去

安裝好 Agent 後,在 AWS 把相對應的 Access key 等資訊產出

在客戶端執行,就會開始作傳輸,傳輸期間可以在 AWS Dashboard 上呈現目前進度等等


參考文件 : 

[1] AWS MGN https://aws.amazon.com/tw/application-migration-service/

[2] AWS EDR https://aws.amazon.com/tw/disaster-recovery/when-to-choose-aws-drs/?cloud-endure-blogs.sort-by=item.additionalFields.createdDate&cloud-endure-blogs.sort-order=desc

[3] AWS VMC https://aws.amazon.com/tw/vmware/

[4] AWS 7R https://aws.amazon.com/tw/blogs/enterprise-strategy/new-possibilities-seven-strategies-to-accelerate-your-application-migration-to-aws/

[5] AWS MGN FQS https://aws.amazon.com/tw/application-migration-service/faqs/


2023年9月27日 星期三

[GWS] 透過 App Script 你也可以完成的 Google Drive 盤點大法

 剛好最近有一個需求,就是盤點公司部門內 Google Drive 的文件總表,由於資料散落在各個資料夾內,對於資料整理較為不便利,想透過一些方法來更快速的去撈取 Drive 內的所有資料以及他所在的目錄,剛好前陣子有在摸索 App Script 這個服務 ,身為工程師就是想把重工的事情透過自動化去完成,因此解決了這件事情 

Step1 . 你需要在你想盤點的 Google Drive 內,新建一個 Google Sheet


Step2. 進入 Google Sheet 後,點選 擴充功能 > AppScript


Step3. 貼上我寫好的程式碼

// 您的 Google Drive 資料夾的 ID
var folderId = "XXXXXXXXXXXXXXXXXXXXXXX";

// 您的 Google Sheet 的 ID
var sheetId = "XXXXXXXXXXXXXXXXXXXXXXXXXX";

// 函數用於從 Google Drive 讀取文件名稱並寫入 Google Sheet
function writeToSheet() {
  var folder = DriveApp.getFolderById(folderId);
  var sheet = SpreadsheetApp.openById(sheetId);
  var sheetName = "sheet1";  // 修改為您的 Google Sheet 工作表名稱

  // 定義資料陣列,將名稱寫入 A 欄位和 B 欄位
  var data = [];

  // 取得資料夾內的所有檔案和子資料夾
  var files = folder.getFiles();
  var subFolders = folder.getFolders();

  // 建立用於記錄已處理檔案名稱的集合
  var processedFileNames = new Set();

  // 將資料夾的名稱和檔案的名稱添加到資料陣列,排除指定資料夾的檔案名稱
  while (files.hasNext()) {
    var file = files.next();
    if (!processedFileNames.has(file.getName())) {
      data.push([folder.getName(), file.getName()]);
      processedFileNames.add(file.getName());
    }
  }

  // 遍歷所有子資料夾,並從中獲取檔案名稱,排除指定資料夾的檔案名稱
  while (subFolders.hasNext()) {
    var subFolder = subFolders.next();
    var subFiles = subFolder.getFiles();
    while (subFiles.hasNext()) {
      var subFile = subFiles.next();
      if (!processedFileNames.has(subFile.getName())) {
        data.push([subFolder.getName(), subFile.getName()]);
        processedFileNames.add(subFile.getName());
      }
    }
  }

  // 檢查 `data` 陣列是否有任何檔案名稱。如果有,則將 `data` 陣列寫入 Google Sheet,從A2和B2格開始寫入
  if (data.length > 0) {
    var targetSheet = sheet.getSheetByName(sheetName);
    targetSheet.clear();  // 清除工作表內容
    targetSheet.getRange(1, 1, 1, 2).setValues([["檔案路徑", "SOP 名稱"]]); // 在A1和B1格中输入欄位名稱
    targetSheet.getRange(2, 1, data.length, 2).setValues(data);
  }
}

// 呼叫函數以執行操作
function main() {
  writeToSheet();
}
Step4. 貼上後有三個欄位需要修改, ID 如何產出 
1. // 您的 Google Drive 資料夾的 ID var folderId = "XXXXXXXXXXXXXXXXXXXXXXX" 

2. // 您的 Google Sheet 的 ID var sheetId = "XXXXXXXXXXXXXXXXXXXXXXXXXX" 

3. targetSheet.getRange(1, 1, 1, 2).setValues([["檔案路徑", "SOP 名稱"]]); // 在A1和B1格中输入欄位名稱 直接開啟 Drive 然後看上面的 URL 字串,同理 Google Sheet ID 也是一樣


Step5. 按下儲存後,執行就會產出此 Google Drive 內的所有文件於 Google Sheet 上方便你做盤點的動作


2023年9月23日 星期六

[AWS] EC2 Cross AZ Backup

 Written by: AWS Community Builder Wang Sheng Hau

Because there is a need for cross-availability zone backup on the project, the AWS Backup service is used for backup.The following are the steps to set up. 

Step1. Access AWS backup Console


Step2. Create Backup Plan


Step3. Create New Plan and enter the backup plan name , Create a backup repository. This is the repository for EC2 backup. Click to create a backup repository.


Step4. Backup frequency can be selected according to usage scenarios


Step5. The backup period can be customized at a specific time. It is recommended to select off-peak time for backup.


Step6. Choose to copy to another availability zone: this time, backup from Virginia Region to Tokyo Region

Create a destination backup repository, which will be automatically synchronized from Virginia to the Tokyo backup repository.


Step7. Assuming that your EC2 is using Windows and uses services such as SQL Server, be sure to enable it.

Back up and restore Microsoft Windows applications with VSS (Volume Shadow Copy Service) functionality


Step8. After completion, you will see the EC2 Backup plan created


Step9. Click to enter the plan and start assigning resources to let him know which services to back up.

You can choose a default IAM role and let AWS help you create a role for AWS Backup.


Step10. Backup resource selection, select EC2 here, you can choose to back up all EC2 or specific EC2


Step11. After setting, click OK to see the set backup plan.


Click the backup repository on the left to see the repository you set. From the restore point, you can see the set automatic backup.


Step12. Click the restore point and press Copy to manually copy across regions to the Toyko Region.


Step13. After switching to Tokyo Region, you can see the created backup save library

You can see that the backup EC2 has been copied to Tokyo Region

Since the Backup Plan has been set in the Virginia Region above, it will be automatically synchronized.


[1] AWS Backup EC2跨越區域建立備份副本

https://docs.aws.amazon.com/zh_tw/aws-backup/latest/devguide/cross-region-backup.html