有同時使用 GCP & AWS Service,但 IT 想統一 Account 去做管理
Step1. 登入 要加入的 GWS Admin 管理介面
A. 選擇 Security > Authentication > SSO with SAML applications.
B. 拉到最下面, Download Metada
Step2. 新增 IAM SAML Identity Provider 在 AWS Account
A. 首先登入想加入的 AWS Account 的 IAM ServiceB. 並點選 IAM Service 下的 Identity ProvidersC. 點選右邊 Add ProviderD. 點選 SAMLE. Provider Name (自行輸入,這邊是輸入 Join 的 GWS Domain)F. Medata document (把剛剛在 GWS 端下載的檔案上傳上來)G. 建置好後會取得 ARN 碼,這很重要 (複製下來貼旁邊)
Step3. 新增 AWS IAM Role 給予 透過 Identity Provider 的 GWS Account 權限
A. 進入 IAM Console,選擇 Role > Create RoleB. 選擇 SAML 2.0 federation 下拉選單會帶出剛建立的 ProviderC. 然後點選 Allow programmatic and AWS Management Console AccessD. 點選 Next : Permissions
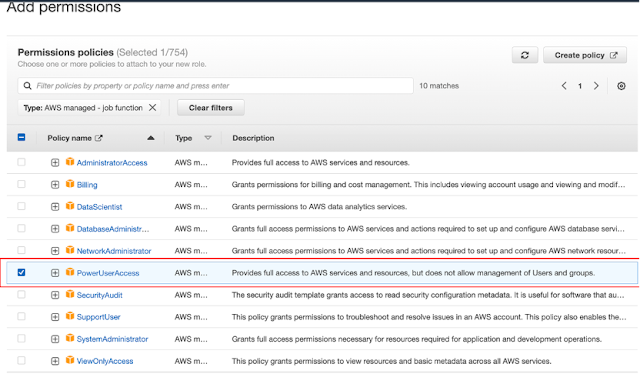
E. 通過篩選把 AWS 預設 Role 帶出
F. 點選 左上方 放大鏡符號
G. 選取 Type > AWS managed – job function
H. 選擇 PowerUserAcces 後,點選下一步
I. Role details 輸入 Role 名稱 (GoogleSAMLPowerUserRole)
J. Description 輸入 Role 的大概內容 (GWS Login PowerUser Role)
K. 拉到最底,點選 Create Role
L. 建好後會看到你新建的 Role
M. 建置好後會取得 ARN 碼,這很重要 (複製下來貼旁邊)
N. 如需新增其他 Role ,重覆 Step 3 所有步驟即可即可
- Role 1 GoogleSAMLPowerUserRole_Login
- arn:aws:iam::174XXXXXXXXX:role/GoogleSAMLPowerUserRole_Login
Step4. 給予 GWS User AWS IAM Role
A. 回到 GWS Admin ConsoleB. 點選 Directory > Users > More Option > Manage custom attributes
C. Category: AWSE. 回到 Users 端,選擇要加入的 User Account
Description: Amazon Web Services Role Mapping
D. Custom fields, enter the following values:
Name: AssumeRoleWithSaml
Info type : Text
Visibility : Visable to user and adminInNo of Values : Muti-value
F. 點選 User > User Information
例如 :arn:aws:iam:: 174XXXXXXXXX::samlprovider/Dev.Cloud.XXX.tv ”,”arn:aws:iam:: 174XXXXXXXXX:role/GoogleSAMLPowerUserRole
I. 一行是一個 Role,假設你需要給予兩個或是更多的 Role請依照同樣方式 Identitiy Providers,IAM Role ARNJ. 假設你有多個 AWS Account 也可以依照前面步驟從 Step 2 開始,在另一個 AWS Account 用同樣步驟進行Step 3 在另一個 AWS Account用同樣步驟進行Step 4 開始,但只需要從 E 項目開始把其ARN 新增至 User Information內即可K. 可看到我同時有兩個不同AWS Account的 Providers + Role ARN
Step 5. 在 GWS 端設定 SAML Application 給 AWS Login
A. 進到GWS Admin 管理介面
B. 點選左邊 Apps > Web and Mobile apps
C. 選取 Add custom SAML App
D. App name : 輸入 AWS Login (顯示在右上角選單內的名稱)
APP Icon : 上傳一個圖示(顯示在右上角選單內的圖示)
E. 點選下一步Services Provider Details
- ACS URL : https://signin.aws.amazon.com/saml
- Entity ID : urn:amazon:webservices
- Name ID format : EMAIL
- Name ID : Basic Information > Primary email
F. 點選下一步在 Attributes 內新增
- 項次一 AWS 選擇 AssumeRoleWithSaml
- App attributes 輸入 https://aws.amazon.com/SAML/Attributes/Role
- 項次二 Base Information 選擇 Primary email
- App attributes 輸入
- https://aws.amazon.com/SAML/Attributes/RoleSessionName
G. 按下 Finish 即完成
H. 在來回到 Web and Mobile Apps 內,點選剛新增的 SAML APP
I. 進入 User Access 把 Service Status 開城 ON for everyone
J. 回到上一頁,按下 TEST SAML Login 就會出現,你配置的 Domain
或是點選右上角 APP 選單,往下滑也會有你建制的 SAML APP
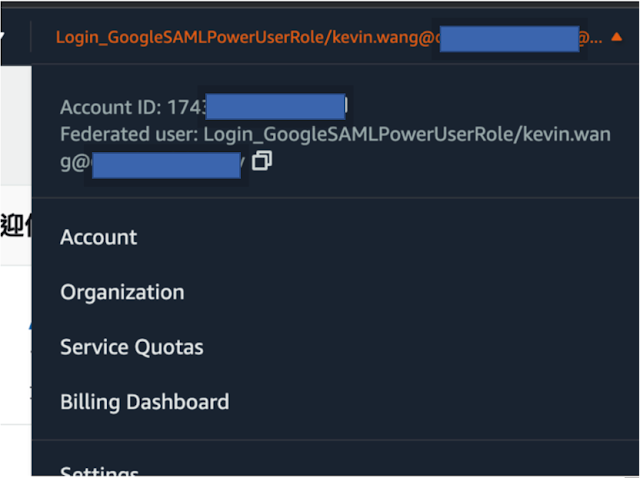
K. 點選後就會出現 AWS Account and 你所賦予的 Role 權限
此 Demo 建置了兩個 AWS Account 兩個 Role
L. 依據不同的權限,不同的帳號做登入測試
Step 6. 查找登入 Login Log
A. GWS 端該如何查詢 Login LogConsole > Reporting > Audit and investigation > SAML log events
B. AWS 端該如何查詢 Login Log
AWS Console > CloudTrail > Event history


